How to make a great photo album. How to beautifully design wedding photos: ideas, photos
Now it’s fashionable to create various handmade items. Try it and you make it. It will not just collect photographs, it will become an exclusive thing and decoration of your home. If you make such a gift to a child or newlyweds, it will always remind not only of the most pleasant events in the life of the owner, but also about you, its creator.
Basic principles of work
To do, you can use ready-made sets for creativity, which are sold in specialized and online stores. The kit usually has everything you need for decoration: beautiful paper, stickers, volumetric decorations. Most often, sets are made in a certain style and are dedicated to some topic: a gift for a newborn, newlyweds, romance, travel.

To pick up all the necessary elements is simple and independent. But design photos, pages and cover better in a single style.
Necessary materials
To create a beautiful scrapbooking album with your own hands, you need the following:
- Thick cardboard for the manufacture of the base (cover and pages).
- A flap of fabric for decorating the workpiece.
- A synthetic winterizer, if you want to make the front and back of the cover soft and voluminous.
- Scissors.
- Pencil.
- Ruler.
- Glue.
- Figured hole punch (to decorate the edge or create small blanks-templates for application).
- Clippings from magazines or other pictures.
- satin ribbons.
- Flat or 3D stickers.
- Various decor (bows, flowers, beads).

Of course, the list depends on your desire, capabilities and design theme. Usually they use all of the above, but it is worth remembering that photographs should still be the main ones. Then you will get exactly the scrapbooking album with your own hands, and not just a collage in this technique. It is not necessary to stick all the elements on one page, it is better to limit their diversity. See that the design looks harmonious, choose one central element, and let the rest only complement it.
How to make a cover
To make a scrapbook album yourself, you first need to complete the basis - the frame of the cover and pages. Decide what size the product will be, and prepare a sheet of cardboard of the appropriate format for the front, back and the desired number of pages.

The sequence of the beautiful cover is as follows:
- Take one cardboard blank and cut a piece of sintepon according to its size. Glue it on the base.
- Cut out a part from a suitable fabric, such as canvas or any other, taking into account the allowances for gluing (1.5-2 cm on each side).
- Apply glue to the free surface of the padding polyester and apply evenly a cloth. Bend the stocks and glue them to the cardboard.
- To prevent the bends from being visible, glue a sheet of beautiful paper or cardboard on top. The back cover is ready.
- The front part can be made in the same way or make another window for photography. To do this, in the basis of cardboard and synthetic winterizer, make a slot of the desired shape and size. The rest is done using the same technology as for the reverse side (the window in the fabric does not need to be pre-cut). After bonding the fabric and synthetic winterizer, the material is cut and bent.
- Insert a slightly larger photo into the window by gluing it to the allowances to the base. On the reverse side, as in the first case, a beautiful sheet of paper or cardboard is made.
- Make holes for the eyelets and install them in the front and back of the cover.
- Insert rings into the eyelets.
The cover is ready. This option is good if you want to make a children's album with your own hands. Scrapbooking master class on creating the design of the album, pages and various design options will help you choose the right solution.

You can do the cover in a different way. In order not to use the ring mechanism, you will also have to make the end part of the cover, or at the same time from the front and back, or stick to the binding (stack of pages). Choose a method convenient for you.
Pages and binding
So, you do the scrapbooking album yourself. The master class from the previous section showed how to make a cover, but this is not enough. You also need to pin pages. If your cover is supposed to be on rings, you can set the sheets in exactly the same way. Another option is to make a binding. The technology is as follows:
- In addition to page blanks, cut out strips of paper the length of the album and a width of 1.5-2cm. In the middle of each part, draw a 2-4 mm wide strip with a knitting needle or other similar object. Cut the corners of the rectangle at an angle of 45 degrees.
- Use paper strips to glue the album sheets together. The groove left in the middle will be between the sheets.
- Glue a piece of bandage with allowances on the sides of 1.5-2 cm and two pieces of tape along the binding width on the end of the stack with glued sheets.
- Glue the tape on the top and bottom edge. This will give the binding strength and a neat appearance.
- Cut out with a margin, like a bandage, a piece of decorative cardboard. Glue it over the bandage, and the protruding edges on the cover.
The design is ready. Start the creative process.
DIY album for a newborn: scrapbooking
This technology allows you to create a gift or souvenir for any holiday quickly enough and at little cost. Everyone will be pleased to be engaged in creativity, so the design of postcards, folders and other things will help to have a good time and become a new hobby.

If you are looking for information on how to make a scrapbook album yourself, then you already have a certain idea or need. If you decide to create for your future baby, then you were not mistaken with the choice. By the way, you can make such a thing for the birth of a baby to your friends or relatives. The main thing is to correctly determine the purpose of the pages, distribute information and leave space for photos.
In the album for the newborn, do not forget to provide a page where parents will record the height and weight of the newborn. You can leave free fields for other important information, for example, the first day at home, the first step and a little tooth. It’s worth even devoting separate pages to these things.
You can arrange an album in a certain color scheme, if you know the gender of the baby in advance. If not, then use neutral shades (white, green, yellow) and children's pictures. Bears, bunnies, pyramids, crib, stroller, balloons will do. Lace and soft, gentle to the touch materials such as fleece will look good. Satin ribbons look very decorative and festive.
DIY wedding album (scrapbooking): master class
A married couple can make this memorable relic by herself, but at the same time, a spectacularly crafted blank can be presented as a gift to the newlyweds.

When manufacturing, try to follow these tips:
- Decide on the format and size. Do not make it too big, but a small one will not do. Focus on a regular A4 album sheet or a little more.
- Given the standard size of the photos, you can choose the square format of the album pages to leave space for signatures and decor.
- Be sure to plan how appropriate it is to make pages, and try to use a uniform design on them (the same arrangement of labels, headings). Focus on how classic books are designed.
- Choose a discreet pastel color scheme. Usually they use white, cream, golden, pale pink. They symbolize romance, and photos on their background will look like the main objects.
- In the sequence of pages, it is better to follow the chronology of the event (first place a photo of the official ceremony from the registry office, then photographs in nature and in the restaurant, after the photograph from the second day).
If you decide to make a wedding album for scrapbooking - the most suitable design technology. Buy special paper, as well as a hole punch with a cliche in the form of hearts and (preferably) to make a curly lace edge. This will help create a romantic commemorative item that will become a family asset. It will be nice to see the newlyweds themselves, show relatives and friends.
Baby gift
Do you want to create a baby album with your own hands as a keepsake? A scrapbooking souvenir will always tell the kid about happy moments in life. Beautifully designed, it will keep your love for baby. The matured "big man" will appreciate the efforts of mom.

It makes sense to make such an album on rings in such a way that you can gradually add pages to it. It is also possible to produce separate “volumes”, for example, “My baby up to a year”, “Life in a kindergarten”, “Grade 1”, etc.
In this album, you are free to paste everything that seems appropriate and important to you: information about the first step, tooth, words. It is interesting to make an imprint of the palms, legs, save a curl.
Original photos in combination with delicate decoration with fabric, children's pictures and other decor will look great.
Family album
This product can be made in any style that matches your idea of \u200b\u200bbeauty and harmony. You make it as a keepsake for yourself. Design on the rings, if you want to add pages. In this case, individual sheets can be issued in different ways. It is worth providing for separate children's pages dedicated to family holidays and travel.
As you can see, it’s not so difficult to master a new technique of artistic mastery - scrapbooking. Do-it-yourself album will be made not just as an accessory for storing memorable pictures, but will become a real work of art.
Taking pictures is a unique occupation, which is not only popular these days, but also helps a person to open himself, to show himself. Modern technologies allow not only taking high-quality photographs, inventing and improving modern technologies, but also sharing them instantly.
Every day, every second person shares his personal or other photos on social networks by mail. However, it would be much nicer to fit comfortably and browse through the album. Especially if it is decorated with clippings, quotes and interesting thoughts. Undoubtedly, there is no such second.
On how to make a photo album with your own hands, not a few articles have been written, a lot of videos with master classes have been shot. It is quite difficult to make a choice. However, there is basic knowledge and invaluable tips that you should learn to get started.
Choose the theme of the future album
Of course, the idea of \u200b\u200bcreating a unique photo album with your own hands does not arise just like that. Perhaps a person is driven by the idea of \u200b\u200bmaking money on such things. However, most often the decision comes suddenly, after a significant event in the desire to preserve every bright moment.
Create an ordinary classic album is not difficult. It is enough to have a few hours of free time and rich imagination. You can decorate an ordinary photo album, or you can create your own album from scratch.
The most popular photo albums are:
- Wedding theme. A wedding is a great moment to start a new family life. A lot of events on this day exhaust the newlyweds, depriving them of the opportunity to enjoy this day and simply contemplate each other. A professional wedding photographer is no longer an innovation. Beautiful photos that convey every emotion of this day simply have to be designed accordingly.
- Photo album for the birth of a baby. The appearance of a child in the family is an important stage. And each parent seeks to remember and display everything in the photo. However, even the most attentive mother is not able to remember every important moment, because there are so many of them. A photo album with quotes will help you remember the most important thing, even after many years.
- An album with a school, educational plot.The first day of the garden, the first class, graduation evening, the institute stages of growing up, which are accompanied by wonderful memories.
- Capturing a bright moment in life. It is not only a vacation, or a journey. You can create an album as a gift, for example, on an anniversary, or on a memorable date. Thematic album to the beloved, beloved is popular.
Anything can become a reason for creating a photo album. The main thing is creative inclinations and the availability of tools.
Tools and materials needed to create a photo album
An original handmade album is a rather expensive thing. Its value will include not only the price of the materials used, but also the dignity of handmade work. But this does not make such a photo album inaccessible. On the contrary, everyone can do it with their own hands, using their talent and imagination.
In order to make a photo album yourself at home, you must have:
The tool you need:
- miniature scissors;
- simple hole punch;
- knife cutter;
- the pencils;
- paints;
- felt-tip pens;
- glue stick;
- curly scissors;
- figured hole punch;
- double-sided tape.
Necessary materials:
- paper. It should be tight enough. You will also need paper for substrates under the photograph, its density should be lower than the density of the main sheet;
- thick cardboard (2 sheets). He is needed to create a cover. You can use old unnecessary cardboard boxes;
- material that will cover the cover. You can use completely different material for this. Old pieces of fabric, jeans, decorative colored paper, to create a soft cover you will need a thin paralon;
- decorative material (depends on the general idea: fur, leather, wood, iron, beads, buttons, ribbons and other decor). Small details of the decor can be done independently: knit, stitch, blind, dry.
Interesting details for your creation can be found both at home and in the scrapbooking store.
Making an album cover
When all the materials and tools have been prepared, you can begin to work. Doing a photo album with your own hands, they often start from the cover.
There are two options for creating a cover:
- Use ready-made: buy a new one, or remove from an old album. This method is the easiest. All that is required of the master is to beautifully design using decorative material. You can sheathe such a cover with any fabric (depending on the idea), use colored paper, and various decor. Often this option does not require pasting the inside.
- Create a new one. This option is already more complex. Since it requires certain knowledge. In order to make a cover it is necessary to decide what shape the future album will be, how many photos can be placed on 1 page. Having decided, you need to cut out the cardboard page we need in size. It is also worth doing with the second sheet of cardboard. Next, you need to draw 2 lines on each sheet (2.5 and 3.5 cm from the left edge of the sheet). After that, cut with scissors in 2 lines.
To decorate the top of the cover with colored paper you need:
- take a sheet of colored paper, 4 cm more than a cardboard sheet from all sides;
- put the album sheet in the middle and circle with a pencil;
- it is good to glue a sheet of colored paper, or both parts of a cover sheet;
- put the cut cover sheet into a drawn square on a colored sheet of paper so that its edges clearly coincide with the drawn lines;
- wrap the remaining edges of the colored paper on the cover, sticking them tightly. It is important to try to do this carefully so that the waters come out as smooth and beautiful as possible;
- it is also necessary to do with the decoration of the inside of the cover. Colored paper can cover poorly glued corners.
Making the first albums it is worth paying attention to ready-made covers. Creating new ones from scratch can cause some difficulties.
To work less on cover design, you can use not ordinary cardboard, but design.
Useful page design tips: how to fill the page correctly
Filling the pages of an album will be easier when disassembled. Having completed each sheet, you can start collecting the album.
Making an album is a science. Therefore, when filling out the page, you should adhere to certain rules:
- Initially, you should determine the semantic center of the page.
- Choose the right colors that complement the photo without breaking out of the general color scheme.
- Choose a decor for pages that will match the color and meaning.
- Choose captions for photos that will necessarily correspond to the general meaning. This can be quotes from famous people, aphorisms, or your own thoughts. Words must be recorded in an album based on the harmony of color.
- Arrange large and small details on the page should be based on balanced proportions.
- Each page of the album should have a bright accent. However, it is worthwhile to ensure that the page is not reloaded. Watching such an album is hard.
- Each page should visually resemble the triangle “photo - title - signature”.
Well, if the page has an odd amount of detail.
In order for the page to be balanced, one should try to follow the rule: a large subject - several small ones. For example, in the upper corner you can place a large volumetric part, and in the opposite corner from the bottom a few small ones.

Family Album Ideas
Creating a family album is quite an exciting undertaking, which can be a great project for the whole family.
A family album is not only a collection of family pictures in one book. This album is important to convey the history of the family, its spirit, collecting all the memorable moments in one photo album.
A family album can consist of named pages:
- Little dad with grandfather or little mom with grandmother and vice versa. This is an interesting idea that will help determine the similarity between all generations.
- Birth of a new family or wedding. Here you can also place not only the wedding of mom and dad, but also grandparents. Original look scanned documents, their clippings, newspaper clippings, made in vintage style.
- The birth of a baby in the family. How to arrange this page is for each mom to decide individually. After all, everyone has their own ideas about the importance of one or another moment of a child’s life. However, experience has shown that there are few pairs of pages for this event. Sometimes one album is not enough. The creation of mini photo albums made in the style of diaries looks original. It can be a whole series from birth to the right moment. Such an album is filled not only with pictures, but also with important recordings.
- The first year of life.
- First time in first grade and beyond.
Pages that are intended for the baby can be supplemented with envelopes that will help to save the first curl, a tag from the hospital, the first tooth dropped out by the child.

Mom can supplement her children's album with her thoughts and memories. Addresses to his child, which he will read with pleasure when he grows up. All memorable dates can be recorded here: the first sound, laughter, the first word, the first step, the first tooth. Such recordings will be a great addition to the corresponding pictures.
Another great idea for a family album is composing a family tree.


Choosing the style of performing a family album (any other too) it is important to maintain this style in the smallest detail. So old photographs, children's pictures will be perfectly combined with retro and vintage style. The decor for such an album can be found in grandmother's things.
Original DIY photo album design ideas
Before you start work, you need to perform its sketch. On an ordinary sheet of paper, outline everything, to the smallest detail. So you can not only visually assess the final result, but also not to forget anything. It is worth doing with each sheet. Their number, by the way, must be calculated in advance at the rate of 1-2 photos per sheet.
The photo album page must have 5 elements:
- image name;
- caption for each image: when, under what circumstances the photo was taken. Perhaps there is something important in the picture that you would not want to forget about over time;
- page background;
- jewelry;
- additions.
Empty pages of the album need to be marked out with a simple pencil, so, after completing the design, extra lines will not be difficult to erase.
You need to fill the page from top to bottom. The likelihood that paints, color works will be smeared will decrease to 0. To begin with, it is worth doing the work with a felt-tip pen and paints so that they have time to dry before the photo is glued.
Inscriptions and quotes are prescribed in the album with ink, felt-tip pen or a helium pen. Ink color, font size and letter slope should also be thought out in advance. You can use newspaper clippings that beautifully lay out the right words. Only after that the album is decorated with flat decorations. They are glued, sewn. Volumetric parts of the decor are recommended to be fixed at the very end. Do this with glue, thread and needles, cloves.
Gluing album details is better with a special glue gun.

Regarding the decoration of the album cover, the cover design looks beautiful with the help of small photos collected in mini collages. The shape of these collages can be given completely different from banal geometric shapes to more artistic ones.
You can pin album pages in various convenient ways:
- using massive rings. Then each sheet of the album must be processed with a hole punch, making a hole in the right place;
- make holes on each page with the same hole punch and fasten them together with beautiful ribbons. In this case, you can use different methods of plexus: from the simplest, all to the more complex;
- album pages can be flashed;
- you can glue the album.
Today, in the world of digital technology, saving your life in pictures is much easier. You don’t need to sit for hours waiting for the result. Just a second and the perfect shot is ready. Most stores their photos on gadgets, on the Internet. It is much nicer to watch the photo, touch them with your fingers. Even nicer if this is an album with a unique decor, where there is something to remember, something to touch. Such an album captures, and every detail evokes its emotions.
If you have a great desire, but no imagination, you can use ready-made ideas, which are quite a lot on the Internet. A lot of articles have been written about how to make a photo album with your own hands, a lot of master classes with detailed instructions have been shot.
People are increasingly using electronic photos, share them on social networks, send to friends. But at the same time, good old paper photos carefully collected into an album are not forgotten. Particularly popular now are home-made album models. The only question is how to make your own photo album beautiful and original. For beginners, this article will tell you step by step and accessible.
Necessary materials and tools
For beginners, before you make a photo album with your own hands, you need to learn step-by-step instructions, be patient, with the necessary tools and materials. It’s easiest to buy a ready-made kit for creating a photo album in the store, but it’s much more interesting and cheaper to create using improvised tools. In addition, all family members can participate in this entertaining process.
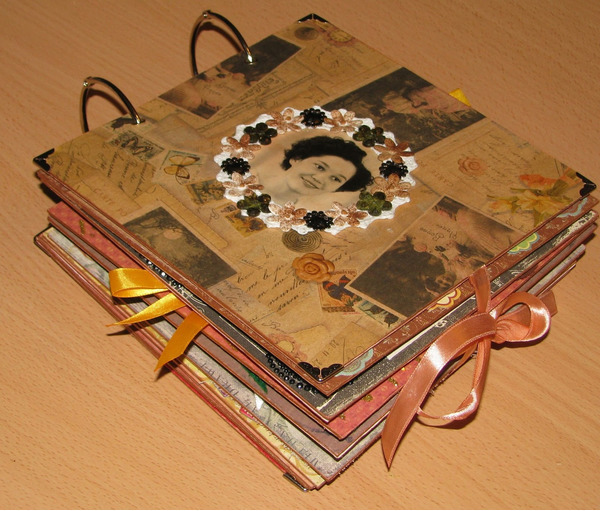
Considering the finished album, one gets the impression that it is simply unrealistic to recreate this on your own. But nothing is impossible!
So, to create such a masterpiece you will need:
It is also important in the design of the use of decorative details. It can be lace, fur or leather details, chains, beads, locks, etc.
How to make an album cover
First you need to determine the size of the future photo album and choose a design style. There are tons of interesting, original design ideas. The cover can be soft fabric, leather, paper, decorated with various elements. 
To make the back of the album cover 25x25 cm in size, you must perform the following steps:
- Measure and cut a square from a thick cardboard, with a side length of 25 cm.
- Cut the soft lining of synthetic winterizer or foam rubber of the same size.
- Connect these parts with glue.
- Cut off the square of the selected fabric, measuring 26x26 cm. This additional centimeter is necessary for the convenience of bending and gluing the lined material.
- On top, you need to attach a sheet of white cardboard, which will hide the foam and the edges of the fabric.
- The back cover of the photo album is ready.
The algorithm for performing the front of the cover is slightly different due to the use of decorative elements. For example, you can make a window for a photo that tells in advance about the contents of the future photo album instead of the name.
To do this, the following actions are required:
- Again measure and cut a square of the given sizes from the cardboard, but in the center you need to cut another square or rectangle.
- A soft lining and cover fabric are also cut out with a hole.
- Connect all parts with glue.
- From the inside, insert and fix the photo into the window.
- From above everything is closed with a sheet of white cardboard.
Then, in both blanks, neat holes are made with a hole punch at a distance of 1.5-2.5 cm from the edge. They insert rings or tape to connect parts of the cover.
Pages and binding
You can not connect the photo album with tape or rings, but arrange it in the form of a voluminous book with a binding. Accordingly, then holes in the parts of the cover will not be needed. For album pages it is better to take thick white paper. 
Between themselves, the sheets are connected as follows:
- It is necessary to cut strips of white cardboard with a width of 3 cm. With their help, the main pages will be connected.
- Then bend each strip in half lengthwise. To get a wider distance between the sheets, bend the connecting strip in the shape of the letter P.
- Carefully stick the bent strips to the pages. The uniformity of the entire photo album depends on this process.
The number of pages can be arbitrary and is determined only by the desire of the master and the availability of necessary materials. After this, you can begin to manufacture the binding.
This will require:
- Take a bandage or dense gauze, cut a rectangle 25 cm long and 3 cm wide larger than the resulting album blank.
- Glue the fabric on the connection pages.
- Then you need to fix a piece of braid or tape along the upper and lower edges of the future binding. This will give the album a more neat and aesthetic look.
- From thick cardboard of suitable color, we make a spine that will hide the entire binding.
- Parts of the cover are glued to the bends of the spine.
Do not attach the spine to the product pages, otherwise they may not open well.
That's the whole secret of how to make a photo album with your own hands. Step by step for beginners it will not be difficult to create such a masterpiece. Now it remains only to fill the album with photos.
Scrapbooking technique in creating a photo album
Scrapbooking is a type of art, with the help of which original photo albums are created and made out. Turning an ordinary boring photo album into a unique plot of our life. 
The origin of this technique is rooted in the distant sixteenth century. At the time, at the peak of popularity, there were notepads for recording important dates, valuable tips, recipes, etc. Towards the end of the 17th century, books began to appear with additional clean pages for taking notes and pasting illustrations. This was the origin of scrapbooking technology.
In the 19th century, with the beginning of the mass distribution of photographs, a real revolution took place - special pockets are made for photos, and pages are painted with various colors and drawings. Particularly popular were albums for girls with pictures, photos and various inscriptions.
Today, there are many ways to design photo albums, and scrapbooking is popular all over the planet.
Ready-made sketches for pages
A sketch is a small page template for a future album. In scrapbooking, a sketch is a prepared sketch for acceleration and convenience of the work process. Ready-made sketches are just a godsend for beginners wondering how to make an original photo album with their own hands. Selecting shades and pictures step by step, you can easily create inimitable pages of a future album. 
These ready-made sketches are simply an inexhaustible source of ideas and inspiration! Gradually, in the process of work, templates will be used less and less, and soon they will completely recede into the background, freeing the path of the master's uncontrollable imagination. It all depends on the desire to act and create. Such ready-made sketches are also useful for visualizing a future photo album.
After all, this is still a draft, on which there is always the opportunity to change and correct something, without damaging valuable materials for creativity in the process of amending. Sketches are used not only by beginners, but also by wise experience of the master. After all, sometimes one glance at the finished sketch is enough that in my thoughts my own idea of \u200b\u200bdesigning the pages of the photo album began to arise.
Thus, it is easy and simple to create unique masterpieces with your own hands.
Homemade Album Theme
 Before you make a photo album with your own hands step by step for beginners, you need to decide on its theme and select the appropriate album decorations.
 It’s not difficult to create an original photo album with your own hands if you have the necessary tools and materials, as well as ideas for its design.
It remains to choose a plot and some significant event from life, for example:
- the birth of a baby;
- first year of a child’s life;
- graduation in kindergarten or school;
- wedding;
- birthday;
- travels.
In general, the theme of a homemade photo album can be any bright event in life, the memories of which you want to be remembered for a long time. 
Another reason to do needlework of this kind may be to create a gift for relatives, colleagues or friends. Simply make an original photo album and present it to any holiday of a loved one. Such a surprise will not leave anyone indifferent!
Wedding album. Step-by-step instruction
The process of creating a wedding photo album is unusually interesting and exciting, because a piece of one’s own soul is invested in it. Beautiful happy newlyweds, their sincere smiles are the main characters of an emerging fairy tale, the beginning of a completely new life together.
It’s an extraordinary feeling to pick up a shabby, dusty photo album many years later, flip through it and understand that love, true love, is not subject to years.
For beginners, before you make a wedding photo album with your own hands, it is worth studying step-by-step instructions for its design:

In the process of creating the album, it is important not to overdo it with additional elements and decor, because the photos remain the main ones.
DIY album for a newborn
The birth of a baby is a new exciting stage of life together, filled with emotions and feelings. So I want to remember every moment, every smile of the child, his first inept steps. But over time, even the most vivid memories disappear from the memory, dissolve in the daily bustle. Therefore, it is worth thinking about preserving these emotions in advance. 
A self-made photo album for a newborn is perfect for this purpose. It will be interesting and exciting not only to view pictures of the baby in the future, but also to participate directly in the process of its manufacture. Loving parents can show all their creative imagination and imagination by investing a piece of their love in their work.
Decor Materials
When designing an album, a newborn wants to use the softest materials and the most beautiful graceful elements. So that even through them tenderness and boundless love for the baby are transmitted. Velvet or velor in pastel colors is perfect for the cover.
Additionally, it can be decorated with such details:
- small plush toys;
- figures from felt;
- lace;
- satin ribbon bows;
- beads and sparkles;
- a lace cap, booties, a strap with sliders, a dummy;
- tags from the handle of a newborn;
- buttons and rivets.
In the process of decorating, it is important not to overdo it with the number of additional elements and harmoniously combine them with each other.
Design pages of a photo album step by step
For beginners, before making a photo album with their own hands, it is recommended to pay attention to step-by-step instructions:

Homemade album is ready. It remains to put pictures of the baby in it, and filling out the pages of the album is important regularly and with love.
Ideas for designing a children's photo album
There are many ways to arrange a children's photo album and make it unique.
Here are some of them:
- It’s better to keep more details, which in a few years will seem even more significant and interesting. For example, a label from the child’s first clothes, a label from the first jar of mashed potatoes or juice, the first diaper, a cut strand of hair.
- A record of the name of the child is welcome. What does it mean and why it was the choice that was chosen.
- You can attach photos of your favorite toy and the first drawing of the baby.
- It is acceptable to spell the words of your beloved lullaby.
- It is recommended to describe the process of introducing new products into the diet of a child, consider its daily regimen: rest, wakefulness, meals.
In general, you should listen to your heart and not be afraid of experiments! And then it will turn out with ease to create a wonderful gift for a child.
Family photo album step by step for beginners
You can make an album with your own hands, not only for some special event, but also for a story about family life in general.
To create it, you can use the following sections:

To create a family album, you will need to spend time and energy, but the result will certainly pay off.
Vintage style photo album
An interesting idea for creating a do-it-yourself album is a vintage-style photo album, i.e. "Antique". 
This genre of creativity has a number of features:

It should be noted that in such an album black-and-white photographs with frayed edges will look more organic.
How to decorate pages and cover in an original way
Before starting work, it is necessary to think over the idea of \u200b\u200bfuture creation and sketch out sketches. On a draft depict everything that is planned to be included in the album, to the smallest detail. This will allow you to visually consider the outcome of the work, taking into account all the nuances. The number of pages is calculated based on the number of photos.
Each album sheet must contain:
- the image itself;
- name of the photo;
- description of each frame;
- decoration;
- additional elements of decor.
It is important to think over in advance what ink, color, font size and slope of the letters will be used to describe the photos. You can also use letters cut from a newspaper or magazine, and collected in whole words.
First of all, flat details are attached to the album, and at the very end - voluminous decorations.
For the original design of the cover, you can use a collage assembled from small pictures. It can be created in the form of a simple geometric figure or come up with a more complex decoration. For beginners, before making a photo album with their own hands, you should step by step to figure out how and what the finished copies are designed for.
Otherwise, the process of creating the first album may cause some difficulties. Making pages will be more convenient before they are fastened into the finished product. It is important to remember that on one sheet attention should be focused on one bright element, in order to avoid information overload of the page.
Video how to make a DIY photo album step by step for beginners
How to make a photo album using the scrapbooking technique, see the video:
A simple do-it-yourself album:
Click Class
Tell VK
We live at a time when any product can be found in the store, it will be of a different price category, of different quality, but to acquire the desired, in general, is not a problem. Therefore, more and more often I want to make a gift close to significant dates and give something unusual, not typical. Such a gift evokes more emotions and is more remembered. In the days of my childhood, on the contrary, after a shortage, plastic photo albums seemed to be a novelty - they are so even and bright. But over time, they began to miss in them some peculiarity, life. Thirty years ago such a gift was a joy, and now a nod of politeness will be awarded. But this does not mean that no one is already printing photos and indulging in memories, you can also give photo albums. But only those in which part of the human presence is embedded. For example, my sister gave me a wonderful gift for the birth of a daughter - a self-made photo album. She used the scrapbooking technique, but there are many more ideas and techniques that help create great designer things.
How to make a photo album with your own hands
When we see the finished result, then it seems impossible to repeat this. Yes and no need to repeat, most importantly, harmoniously combine all the elements and colors. This is what will be discussed.
The easiest way to create an album with your own hands is to go to the shop for needlewomen (and there is one specially for scrapbooking) and buy a ready-made kit. Usually, it includes sheets with prints of the quantity you need, frames, stickers. You can buy cardboard, which does not have ugly stiffeners. And at home, applying fantasy, just collect an album. But, it is more expensive than making such beauty from improvised means.
For example, a set of 6 sheets with decor will cost you 400 rubles. The more filling in the set, the more expensive it will be.

But, after all, not everyone loves bright and colorful designs, so for a beginner, you can just take colored thick paper or print a picture on your own printer if your apartment is equipped with such technology.
For the needlewoman, before starting work, you need to understand what she needs, choose a place where there is an even wide surface.
The paper on the front side can be replaced with a cloth. Before work, all segments must be ironed carefully - this will help to accurately and evenly cut the desired dimensions and maintain a beautiful appearance.
You will need an adhesive component: double-sided tape and Moment glue.
Also, it is beautiful and convenient when the photo album is on the rings or with offline pages. This can be done beautifully with the help of the grommet installer, which is sold in hardware stores for 150 rubles.
Another tip for choosing a color scheme: where there is a lot of decor, choose the most not loaded and not variegated background. Otherwise, the effect of bad taste will turn out and the decor will be lost in variegation. Most often, this rule applies to the front cover. All colors should be combined, they can be supported by a pattern, tones in the same color scheme or be colors - companions. This may help.

The interior of the craftswoman is also trying to make very complete. Use also pockets and envelopes with closing elements for small photos or details dear to the heart. Everything is suitable for decor: wooden shavings and saw cuts, twine, buttons and lace, ribbons, napkins, beads, twigs, artificial flowers and pompons. In general, everything that you have is in the sewing box, in the kitchen, in the children's room.

Glue the substrate in place of the proposed photo, this will add unusualness and zest to each spread.
It’s not a problem to print various tags and places for recordings now. Print in the usual copy center and stick to the photo album.
We figured out a little where to get materials, what can be used, now we will move on to a step-by-step master class for creating a photo album with our own hands.
Do-it-yourself photo album step by step with a photo, detailed master class
I think that now most of this information is read by beginners who are still moving towards their own technique and manner of performance. Therefore, we will analyze a simple version of the album. By the way, did you notice that the craftswomen who make such albums to order always have their own style? Some use unusual natural materials, some a specific composition in the decoration. Even, at first glance, similar albums made in the same technique will differ greatly in design and decor.
We will need:
- Two cardboard blanks for cover
- Two small cardboard blanks for the butt
- Clay Moment
- Double sided tape
- Beautiful fabric, preferably linen or cotton
- Grommet installer, ruler, scissors and decor
Sizes can vary as you need. But, these sizes should go across all the blanks.
If you do not want to spend money on your first photo album, then you can replace the purchased cardboard with cardboard from a shoe box.
Before work, you need to cut off all the workpieces by size. So the cover should be slightly larger than the inner pages, usually 0.5 -1 cm.
- Glue a double-sided tape around the perimeter of the cardboard blank, iron the fabric for the cover and put it face down.

- Glue the cardboard blank to the fabric so that 1.5 cm allowances remain on the sides.

- Glue a small element at a distance of 4 ml from the main part - this will be the end of the album.

- Glue double-sided tape around the perimeter of the cardboard, capturing a small part.

- We cut the fabric corners, but leave 1.2 mm so that the cardboard does not stick out.

- Glue fabric allowances on the tape.

- The fabric corners can not be trimmed, but bent into a triangle and glued, as in the photo. Do as it seems more simple.

- We do the same with the second part of the back cover.
- Glue the decor

- We coat the blank from the wrong side with glue and decorate with cardboard.

- In the place where the root should be bent, you need to push (not tear) the cardboard and bend it.

- Now you need to make even cuts in the spine, for this we mark 1.5 cm above and below.

- We take the grommet installer and make a hole. We install a grommet in it.

- We make holes on all pages.

- It is necessary to make an even fold on all the leaves in the direction in which they will be flipped.

- We connect all the details with a lace.

When decorating the inside of the cover, the glue can be smoothed out with paper so that there are no waves.
Start decorating pages using decorative elements. You can also make it closed with an elastic band or tied with a ribbon.
The simplest photo album in scrapbooking technique is ready.

For example, I’ll give you a few pages that have already been drawn up, but you can also leave empty colored leaves, which is also beautiful.

Options for the inscriptions below in the photo.

I really like it when they design the first page as a title page.

Below is an envelope page layout option.

More ideas for using design, pockets on the page.

I invite you to view another idea of \u200b\u200bmaking a beautiful photo album.
DIY photo album design ideas (family, wedding, for a newborn)
Scrapbooking products continue to win the love of the audience with their tenderness and an abundance of details. There is a lot of volumetric design, which not everyone likes and is not always convenient. Having rummaged on the Internet, I found some very interesting ideas using a different type of material. For example, the technique of burning, embroidery, wood carving, metal elements, etc. is used. I bring several works that have "laid down on my soul."
Scrapbooking is more suitable for tender girls, young mothers and children. This technique allows you to create beautiful photo albums for newborns, for a wedding.

For the baby, you can create such beauty in the photo, here the highlight is that all the elements are sewn. Imagine that you can even use the technique, which will also give originality to the product.

Another very beautiful option for the design of the cover with lace and ribbons. Pay attention to how harmoniously selected all the shades and background for the decor. It is necessary to strive for this. Such beauty can be given to any family for any occasion.

Another version of the family album. Two colors are used, one basic calm, the other saturated, but in less quantity. A synthetic winterizer was also applied to the cover base to give the appearance of volume and texture.

But, I think that for people of a more serious age, on the anniversary, as well as for people who appreciate natural charm, products with elements of wood and leather are suitable. See what wonderful and colorful products are obtained.

Another very interesting option.

Using the technique of burning, you can make an ornament and drawings. There are also a lot of materials for colorizing and revealing a wooden texture, everything will come in handy here!


An interesting option for using a rough texture of wood and lace.


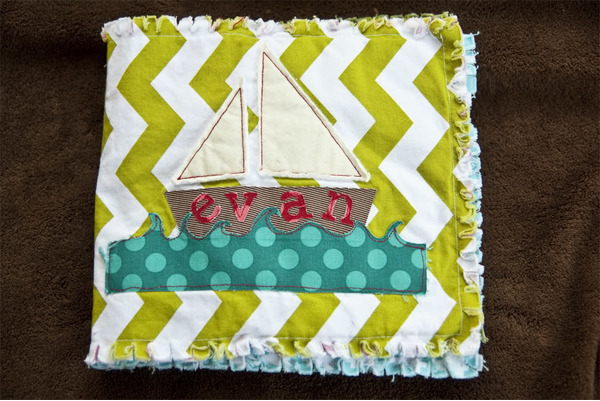
There is a maritime theme.

Another version of a family album in aged technology using belts.

Look how interesting the faux leather background looks on the product.

Using embroidery very distinguish the craftswoman from the whole variety of man-made albums. Do you agree? Very unusual, and not at all difficult.

For children, a playful background is more suitable.

Or here's another children's option.

For those who like to brightly celebrate and collect such moments, another option for the design of the cover with embroidery.

See how all the shades and details of the design are combined. The boys should like it.

Another tender album for a child or a young mom. I think it will be nice to pick it up and look at it, and then read the inscription on the tags of the newborn and look at the first photos.

Well, another very concise, but self-sufficient option. A little decor, but a feeling of completeness.

I really liked the ideas, do not stop wondering how much people have imagination and creativity.
What is your opinion?
Tweet
Tell VK
A family album is an important element of every home. He is the center of attention when visiting friends and relatives, at family celebrations and in the warm moments of memories. This is a mystery of the past, a kind of relic, the life story of each of us. Today, most photos are stored on phones, tablets, mobile. But it is much nicer to turn the pages of history and touch the pictures than to view them on the monitor. A good alternative to electronic folders will be a self-made photo album.
Scarpbooking photo album
The clippings book is a literal translation of the newfangled trend in creating photo albums. Such albums can have everything: dried flowers, “tags” for a newborn, small significant things, cuts, lace, beads and, of course, a photo. Design fantasy knows no bounds, and modern materials make it possible to realize any ideas.
Masters work in several directions:

- modern. All relevant attributes, stencils, blanks, vibrant prints, rhinestones and more are relevant. In this direction, you can often find shabby chic;

- in retro and vintage albums use aged paper, cute trinkets, jewelry, clippings from old newspapers or magazines, lace, braid;

- romantic implies the use of everything gentle and airy: lace, fabric, ribbons, jewelry, braid, poetry.
When creating an album on any subject, it is important to think through the main design and draw up a color composition. Key tips for beginner’s scrapbooking:
- decide on the style in which the album will be performed;
- pick up the background of the pages. It should be combined with the shades of colors used in the album;
- to think over the semantic content of the album, if you need to pick poems, quotes, make clippings.
How to make an album with your own hands, see the video below.
A Love Story: A Wedding Album

A wedding photo album does not have to contain solely photographs of the celebration. You can start a story about your family with a story of acquaintance: joint pictures on vacation or moments of dates.
Creating a wedding album with your own hands, you need:
- choose size. Option 30 * 30 cm is ideal to fit several photos on the page. The parameters of 20 * 20 cm mean a standard photo on the page and a few little things. But the album 25 * 25 cm is an average option. You can place several pictures and diversify with additional inserts;
- of materials you will need: thick paper (cardstock), film with a pattern (overlay), cardboard figures (chipboard), foil, beads, garter, invitation cards, napkins, bows, buttons, lace, cards, tulle.
See the video below for the process of creating an album.
And naturally, your family life will be long and happy, so you need to provide pages for future anniversaries.
How to make a cover in the video below.
Create an album for the newborn

When creating a children's album, it is appropriate to use a variety of scrapbook paper, stencils, baby things. For registration may come in handy:
- imprint of the handle or legs of a child. This can be done using ordinary gouache, or it can be done on a special basis, which is then placed on the cover;

- pregnancy photos and ultrasound images;
- horoscope, the meaning of the name - all this will be a good addition to the album;
- pictures of your favorite toys will decorate the pages;
- a lullaby for your baby is suitable for a photo of a sleeping baby;
- the first phrases, a memorable drawing, a page from the diary - everything that seems ordinary now can be of great value in 10-15 years;
- menu, favorite dish, adorable cartoon - mentioning these moments will be a good addition to the photos.

How to create a children's scrapbooking album, see the video below.
Creative and non-standard will be a children's album of envelopes. Watch the master class in the video below.
Chronicle of generations in photographs

Family photo album is a great gift for your wedding anniversary to your nearest and dearest. The history of their family, photos of children and all significant events can be placed under one binding. Such an album will look good in vintage or retro style.
For a family record album you can use:
- lyrics, relevant at specific times, poems and sayings, newspaper clippings;
- significant things or their photos;
- artificial flowers, various stamps, elements of old jewelry, iron butterflies, flowers, curly photo frames, suede and velvet.
See an example of the design in the video below.
An integral part of such albums is aged paper. Make it easy:
- in order to give the edges a "frailty", you need to treat them with a distresser;
- coffee will turn a white sheet of paper yellowed from time to time. Brew 5 full teaspoons of coffee in 200 ml of boiling water. Let stand for 10 minutes under a closed lid and strain. Squeeze a sheet of paper lightly, dip it in coffee and hold it for no more than 5 minutes. Dry and iron;
- black tea will give yellowness to paper. Brew 5-10 tsp. in a glass of boiling water (depends on how much you need to yellow the sheet). Insist 10 minutes and strain. Keep the leaf infused for about two minutes. Dry and iron. You can drip several times on the sheet with tea leaves.

Creating a family tree is a good idea. You can realize the idea by drawing it, cutting it out of cardboard, felt or fiberboard.
How to make a family tree with your own hands, see the video below.
DIY travel book

For lovers of travel will be relevant travel book - a book of photos, notes, plans, saved tickets and small souvenirs.
How to arrange a travel album, see the video below.
Travelbook contains:
- a lot of records. By hand and not necessarily under the ruler. These can be stories about their expectations from the trip, about what they managed to realize, a description of the highlights of the trip;
- each topic can be dedicated to a page: food, leisure, sights, new acquaintances;
- special pockets for small souvenirs.
An overview of the full travel album design in the video below.
Stroller, heart or house: create curly photo albums

Who said that a photo album must be rectangular? Curly albums look bright and non-standard. You can download ready-made stencils from the Internet, or you can create them yourself. An unsurpassed family album in the form of a house was made by blogger Elena Stepanova. The author fashioned a multi-storey building, and placed the photos as follows: as the family grows, the floor increases. The result was amazing.


Figured albums can be family, children's, reflect the hobbies of households.

The pet’s album is interesting for children, because filling it with pictures of the pet is very entertaining.

How you can arrange a figured album, see the video below.
Mini Album for Beginners

Such an album will be a good start for those who try themselves in scrapbooking. It can be issued in the form of books, boxes and accordions. The latter option is the easiest to implement. All that is needed is cardboard 70 * 10 cm, decorative paper, double-sided tape, tape. The album is folded as follows:
- folds are made on cardboard at a distance of 10 cm. This will be a binding;
- two squares measuring 10.5 * 10.5 cm, glued with decorative paper, which are attached to the binding, will appear on the cover;
- sheets of decorative paper measuring 9.5 * 9.5 cm are glued to each page of the album;
- the album is decorated with a tie.